
Using Pneumatic Clip Tool for Upholstery: How To Install Car Seat Covers
Table of Contents
Upgrading your vehicle’s interior? Installing new car seat covers can be a satisfying DIY project—if you have the right gear. A pneumatic clip tool makes the job faster, cleaner, and way more professional-looking. But which tool fits best? What hog rings should you use? Let’s break it down.

Why a Pneumatic Clip Tool Is Essential for Upholstery Work
Working with thick automotive fabric or tight spaces can become frustrating with manual pliers. That’s where the pneumatic clip tool steps in. This air-powered device allows you to clamp hog rings with minimal force. Whether you’re rebuilding classic interiors or just revamping factory seats, using pneumatic tools offers consistent fastening, precision control, and serious time savings. Add to that the comfort factor—your hands will thank you after a few dozen hog rings.Required Tools for Installing Car Seat Covers
Before diving in, round up everything needed. Here’s your essentials kit:
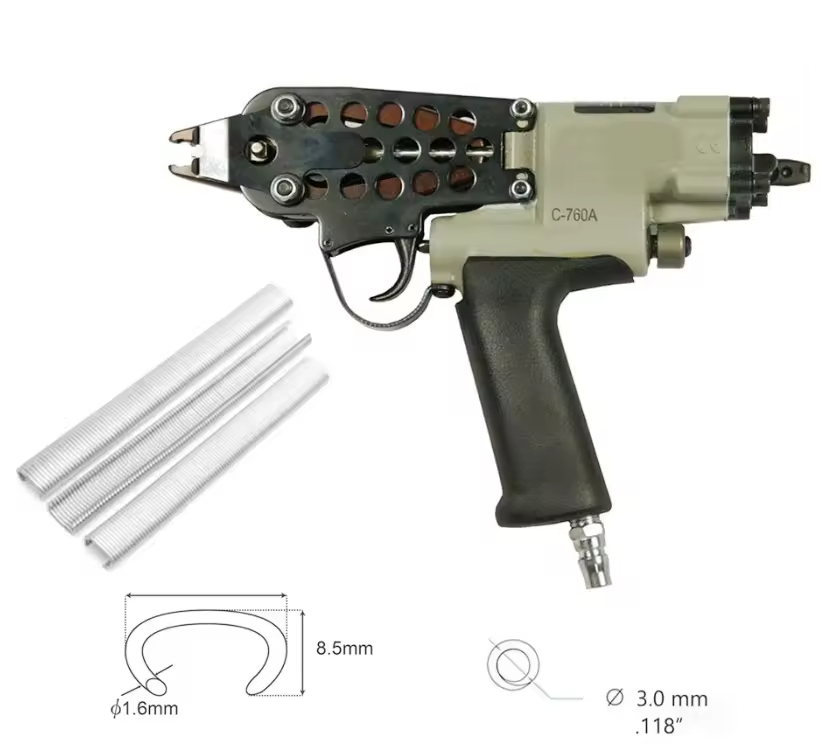
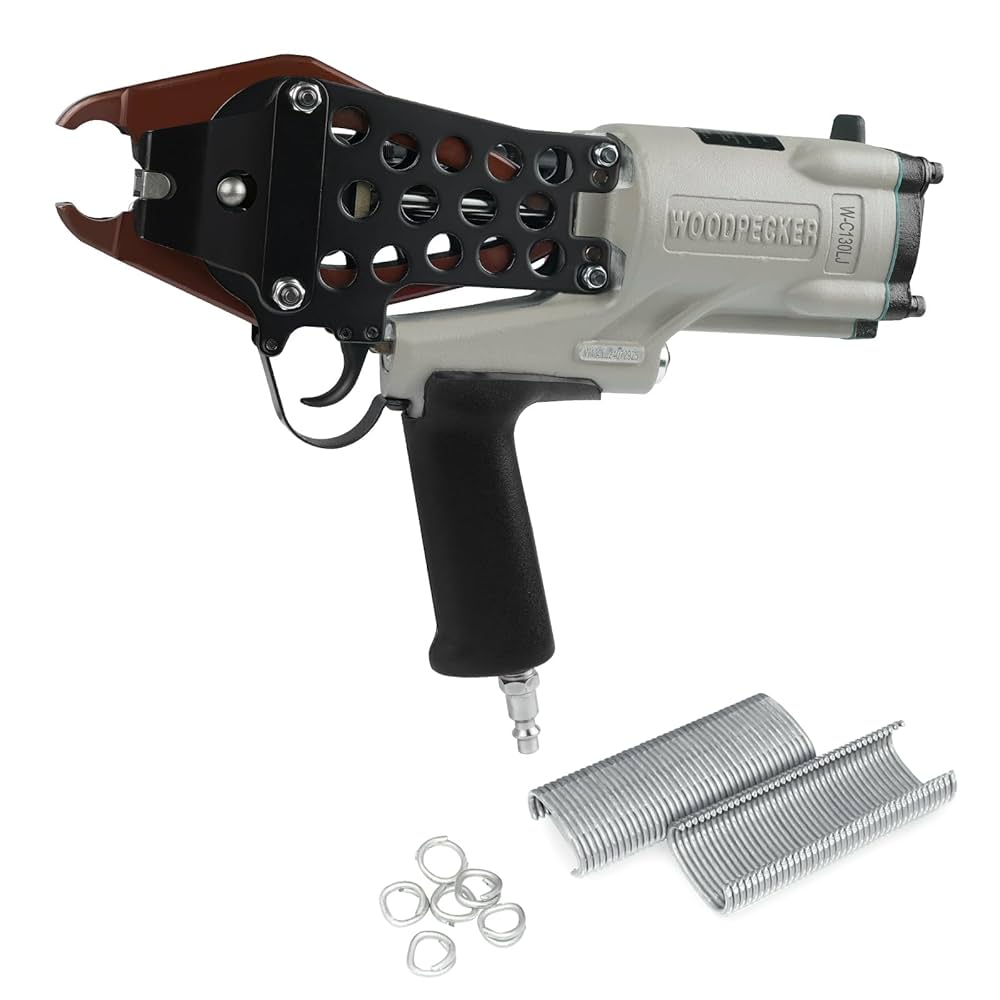
Pneumatic clip tool (or C-Ringer tool)
Hog rings (varies by seat type)
Pneumatic stapler or pneumatic stapler gun (optional for foam or panel fixing)
Air compressor (matched to your tool’s PSI range)
Socket wrench
Flat-head screwdriver or panel popper
Utility knife or fabric shears
Work gloves
Zip ties (for tucking)
Safety goggles
If you’re diving deep into seat disassembly, having a backup pneumatic air gun tool helps remove rusty bolts or fasteners with ease.
Which Type of Hog Ring Should You Use?
Choosing the right hog ring matters more than you think.
Seats typically call for C-rings or D-rings. The pneumatic C-ring tool fits U-style or C-style rings, which work perfectly for most car seat anchor points.
Quick tip: Check your seat cover’s mounting points. If you’re working on older leather models or aftermarket seat foam, opt for galvanized steel rings. For modern fabric, stainless variants prevent rust and hold tight.
Stay clear of cheap rings that bend under pressure—these fail fast and make your work look sloppy.
Where to Purchase High-Quality Pneumatic Clip Tools
Not all tools are built equal. If you’re after reliability, go with brands that specialize in pneumatic tools for automotive or furniture upholstery.
Look for these must-haves:
Comfortable grip
Adjustable pressure control
Compatibility with standard C-rings
Lightweight build for long sessions
Suppliers online offer everything from pneumatic staple guns to industrial-grade pneumatic clinching tools. Just check user reviews before you click ‘Buy’.
Some reputable tool outlets also sell bundled upholstery kits—ideal if you’re new to this game.
Step-by-Step: How To Install Car Seat Covers Using Pneumatic Tools
Ready to transform those tired old seats? Follow this workflow for seamless installation.
Step 1: Remove the Car Seat
Start by disconnecting the battery—always safe to kill power when dealing with airbag-equipped seats.
Unbolt the seat from the floor using a socket wrench. Move it out of the vehicle and onto a sturdy work surface.
Watch out for electrical plugs underneath—label and disconnect each one.
Step 2: Remove the Old Seat Cover
Now the fun begins. Use a flat-head screwdriver to pop clips and release fabric from the seat base. Peel back the upholstery slowly.
You’ll find hog rings or zip ties holding the material to the seat foam. Cut these out carefully. A pneumatic clinching tool can also be used if you’re dealing with older or dense materials.
Dispose of the old fabric and clean the foam thoroughly. This helps new covers sit better and last longer.
Step 3: Prep the New Cover
Lay the new car seat cover flat. Make sure it matches the layout of your foam base. Mark anchor points for hog rings or fasteners if necessary.
Sometimes, trimming is required around plastic edges or hooks—don’t rush this part.
Step 4: Install With the Pneumatic Clip Tool
Now comes the satisfying part.
Load your C-Ringer tool with the correct size hog rings. Position the cover over the foam. Start from the center, pulling the fabric tight and working your way outward.
Fasten each ring through the fabric loop and into the seat frame or rod inside the foam. Use short bursts from the pneumatic air gun tool for precision.
Repeat this process methodically. Don’t rush—tight and symmetrical fastening makes all the difference.
Step 5: Reinstall the Seat
Reconnect any wiring under the seat and bolt it back into place. Tug and test—make sure it doesn’t wobble.
Finally, reconnect the battery and test your seat’s electronics.
Tips for First-Time Users of Pneumatic Upholstery Tools
Start on a test fabric first
Always wear goggles and gloves
Keep your air compressor PSI within the tool’s range
Clean your tool after use—dirt clogs = misfires
Store hog rings in dry places—rusted rings jam up fast
The first job might take a few hours. But by your second or third seat? You’ll move like a pro.

Final Thoughts: The Right Pneumatic Clip Tool Makes All the Difference
If you’re planning on reupholstering car seats with clean lines and no fuss, don’t skimp on your gear. A pneumatic clip tool turns a difficult job into a smooth one. When paired with proper hog rings and step-by-step care, your finished result will outshine anything done by hand.
Skip the hassle of needle and thread. Let the air do the work.